
MLflow model registry에 저장 및 관리
MLflow UI를 보면 Experiments와 Models 2가지 메뉴를 확인할 수 있는데, 실험 관점과 배포 관점을 나누어 관리하는 부분이라고 생각하면 됩니다. 따라서 MLflow에 등록된 모델을 배포할 때는 Models에서 진행하는게 좋습니다.
모델 등록
모델 등록은 MLflow에 저장되어있는 모델을 등록하는 것으로, 한 번 더 저장하는 과정이 아닙니다. mlflow.log_artifacts로 모델을 저장하고, mlflow.register_model로 등록하게 됩니다.
with mlflow.start_run() as run:
    trainer.train()
    train.save_model()  # save 'output_model' directory

    mlflow.log_artifacts('output_model')
    model_uri = f'run:/{run.info.run_id}'
    register_result = mlflow.register_model(model_uri, 'mnist_test')

    print('Model Name: ', register_result.name)
    print('Model Version: ', register_result.version)
모델을 등록할 때는 run_id를 이용해서 등록해야합니다. 학습할 때 start_run을 이용하면 run_id를 쉽게 가져올 수 있습니다. 코드에 있는 model_uri 포맷에 맞춰 작성하면 됩니다.
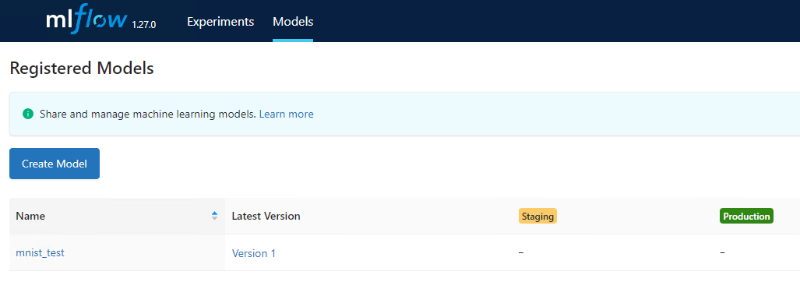
모델은 mlflow.register_model에 작성한 모델 이름(mnist_test)으로 생성됩니다. 모델 이름이 없으면 자동으로 생성되고, Version은 1부터 자동으로 붙습니다.
 MLflow UI
Colum에서 볼 수 있듯이 각 모델을 Staging과 Production에 하나씩 등록할 수 있습니다. 검증 단계에서 Staging 모델을 쉽게 검증하거나, 배포 단계에서 Production 모델을 쉽게 가져다 쓸 수 있도록 해줍니다.
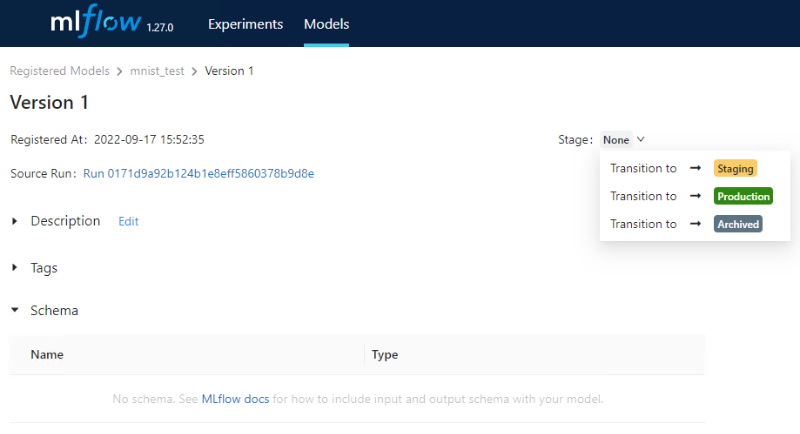
Stage는 None, Staging, Production, Archived가 있습니다. 맨 처음 상태가 None이고, Staging과 Production은 각각 하나씩만 등록이 가능합니다. Archived는 Staging이나 Production으로 교체된 모델이 Archived가 됩니다.
이 부분을 코드로 작성 가능합니다. 위 코드에서 이어서 작성하면 아래와 같습니다.
with mlflow.start_run() as run:
    trainer.train()
    train.save_model()  # save 'output_model' directory

    mlflow.log_artifacts('output_model')
    model_uri = f'run:/{run.info.run_id}'
    register_result = mlflow.register_model(model_uri, 'mnist_test')

    print('Model Name: ', register_result.name)
    print('Model Version: ', register_result.version)

    mlflow_client = mlflow.tracking.MlflowClient(tracking_uri='http://...')
    mlflow_client.transition_model_version_stage(
    	name=register_result.name,
        version=register_result.version,
        stage='Staging'
    )
MlflowClient에서 tracking_uri는 환경변수로 MLFLOW_TRACKING_URI를 등록했으면 생략이 가능합니다. 이렇게 학습 후 모델을 바로 Staging으로 등록이 가능합니다.
댓글남기기